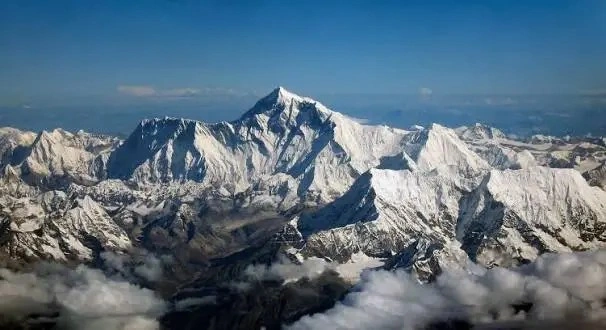
A first high-altitude trek can seem daunting enough, particularly when you are going into the Himalayas for the first time. The Gokyo Lakes trek is considered accessible for beginners, but knowing the rationale behind its popularity, as well as how to go about it, could be the difference. In the following sections, we explain what the trek is actually like on the ground and why the trek is recommended for first-time high-altitude trekkers.
You will find out how high altitude impacts the body, how the process of getting used to it should take place, and how long an itinerary friendly to beginners should be. Having a day-by-day plan helps you plan every single day, and as such, you are in a better position to prepare mentally and physically before you get there.
This guide also covers essential practical details for the Gokyo trek, including the most favorable trekking seasons, trekking packages, required permits, pricing, and the option to trek independently or with a guide.
Why the Gokyo Lakes Trek Is Suitable for Beginners
The gradual design of the trail is the reason why the Gokyo Lakes trek is suitable for beginners. The ascents are slower and more spaced compared to most Himalayan treks, leaving time for your body to acclimatize to the height. You are not required to climb steep ascents daily, and on most days of walking, the time ranges from 4 to 6 hours, which is manageable even for novice trekkers. This makes the trek challenging yet achievable.
The well-established teahouse system along the route is another feature that makes it accessible for beginners. There is no need for camping, cooking, and technical mountain knowledge. Lodges provide beds, hot meals, and basic comforts, which reduces stress for first-time trekkers. Knowing that food and shelter will be available ahead makes the experience less mentally demanding, particularly for international trekkers who are not aware of remote trekking environments.
Finally, Gokyo Lakes are less populated than the Everest Base Camp, making the trekking experience of the former less chaotic and less packed with people. Novices find it both physically challenging and mentally taxing to deal with noise and crowds, with pressure to maintain a fast pace. Its less crowded trails allow trekkers to walk slowly, take a break where necessary, and actually appreciate the towering snowy mountains, glaciers, and deep turquoise lakes without feeling hurried.
Quick Facts
-
Maximum altitude: 5,357 m (Gokyo Ri)
-
Difficulty level: Moderate (beginner-friendly with preparation)
-
Total duration: 12-14 days (recommended for beginners)
-
Starting point: Lukla
-
Key attractions: Gokyo Lakes, Gokyo Ri viewpoint, Ngozumpa Glacier, Himalayan panoramas
-
Accommodation: Teahouses/lodges
-
Best seasons: Spring and Autumn
Altitude, Acclimatization, and Safety for Beginner Trekkers
The greatest obstacle that novices encounter on the Gokyo Lakes trail is not distance or terrain, but the elevation. The higher you go, the less oxygen reaches your body, and the air feels thinner. This may result in symptoms such as headache, fatigue, loss of appetite, or insomnia. These are typical symptoms that can be managed as long as the itinerary is structured in a manner that enables the person to acclimate with time.
The only thing to do is to acclimatize. The trek includes scheduled rest days at strategic points such as Namche Bazaar and Machhermo to facilitate acclimatization. On such days, you hike to higher elevations during the day and return to sleep at lower elevations at night, and this makes your body adapt without harm. The most common and serious mistake beginners make is skipping acclimatization days.
The Gokyo Lakes trek is relatively safe compared to other high-altitude treks, as it has health posts, experienced guides, and excellent evacuation pathways. The main safety guidelines are straightforward: you should walk slowly, stay well-hydrated, eat regularly, and listen to your body. Most novice climbers have a comfortable and safe trek with a well-paced itinerary and basic awareness of the mountain and altitude complications.
Ideal Duration of the Gokyo Lakes Itinerary for Beginners
In the case of beginners, the Gokyo Lakes trek should take 12 to 14 days, with arrival days and buffer days. This duration is not merely for comfort; it is essential for safety and ultimately enhances enjoyment. High-altitude trekking places stress on your body in a fashion that cannot always be anticipated, particularly when this is your first time trekking above 3,000 meters. The longer your itinerary, the more time your body gets to get used to lower oxygen levels, and the less chance you have of having altitude sickness.
Shorter itineraries may seem appealing on paper, but they are typically characterized by a speedy increase in elevation, fewer days of rest, and protracted times on the trail. For newcomers, this causes fatigue, extends recovery time, and increases the risk of health complications.
A 12-14-day schedule more evenly distributes the elevation gain and incorporates planned acclimatization days, which are mandatory for first-time high-altitude trekkers. These rest days are not wasted time; without them, the trek can become impossible or unpleasant.
The other reason why this duration works well is the flexibility. Delays due to weather, particularly flights in and out of Lukla, are usually frequent. Having buffer days reduces stress, and you do not make hasty decisions.
This buffer allows beginners to walk at their own pace, listen to their bodies, and complete the trek without any stress. One should always travel at a slower pace in the Himalayas, and it will almost always result in a more worthwhile experience.
Day-by-Day Gokyo Lakes Itinerary for Beginners (12-14 Days)
This schedule is designed for first-time high-altitude trekkers, with careful attention to altitude gain, acclimatization, recovery, and mental comfort. Each day is planned for either gradual ascent, acclimatization, or recovery.
-
Day 1: Arrival in Kathmandu (1,400 m): Rest and preparation are the priorities. International travel can be exhausting, and starting the trek fatigued increases health risks. Use this day to check gear, finalize permits, and attend briefings if trekking with a guide. Staying hydrated and getting quality sleep prepares your body for altitude.
-
Day 2: Fly to Lukla (2,860 m) & Trek to Phakding (2,610 m): The flight to Lukla is short but dramatic, marking the start of the adventure. The trek to Phakding is easy, allowing beginners to adjust to the trail, terrain, and pace. Focus on orientation rather than endurance and maintain a slow, steady rhythm.
-
Day 3: Phakding to Namche Bazaar (3,440 m): This is the first physically demanding day, with a significant altitude gain. The trail passes suspension bridges, forests, and a long uphill section. Beginners should take frequent breaks and maintain steady breathing. Reaching Namche Bazaar is a major milestone and the heart of the Khumbu region.
-
Day 4: Acclimatization in Namche Bazaar: This day is essential. A short hike to a higher elevation and return helps the body adapt. Mild symptoms like headache or fatigue are normal. Proper acclimatization at this stage improves the chances of a successful trek.
-
Day 5: Namche Bazaar to Dole (4,200 m): Leaving the busy Everest Base Camp trail, the route toward Gokyo is quieter and peaceful. The climb is gradual but noticeable. Breathing becomes heavier, and pace slows, introducing trekkers to true high-altitude conditions.
-
Day 6: Dole to Machhermo (4,470 m): Though the distance is short, the altitude makes this day challenging. Walking hours are limited to reduce physical stress. Machhermo is an ideal rest point for the body before further ascent.
-
Day 7: Acclimatization in Machhermo: Rest is crucial at this altitude. Light daytime activity aids oxygen absorption, while sleeping at lower elevations helps recovery. Reduced energy and appetite are common. Skipping this day increases health risks.
-
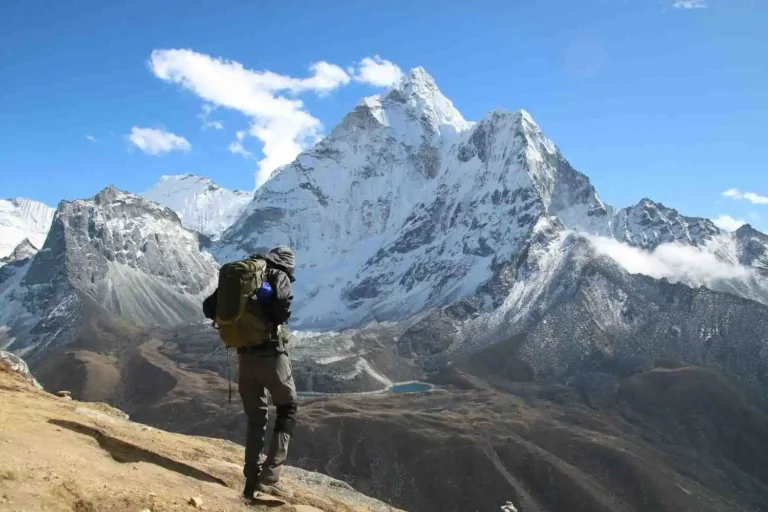
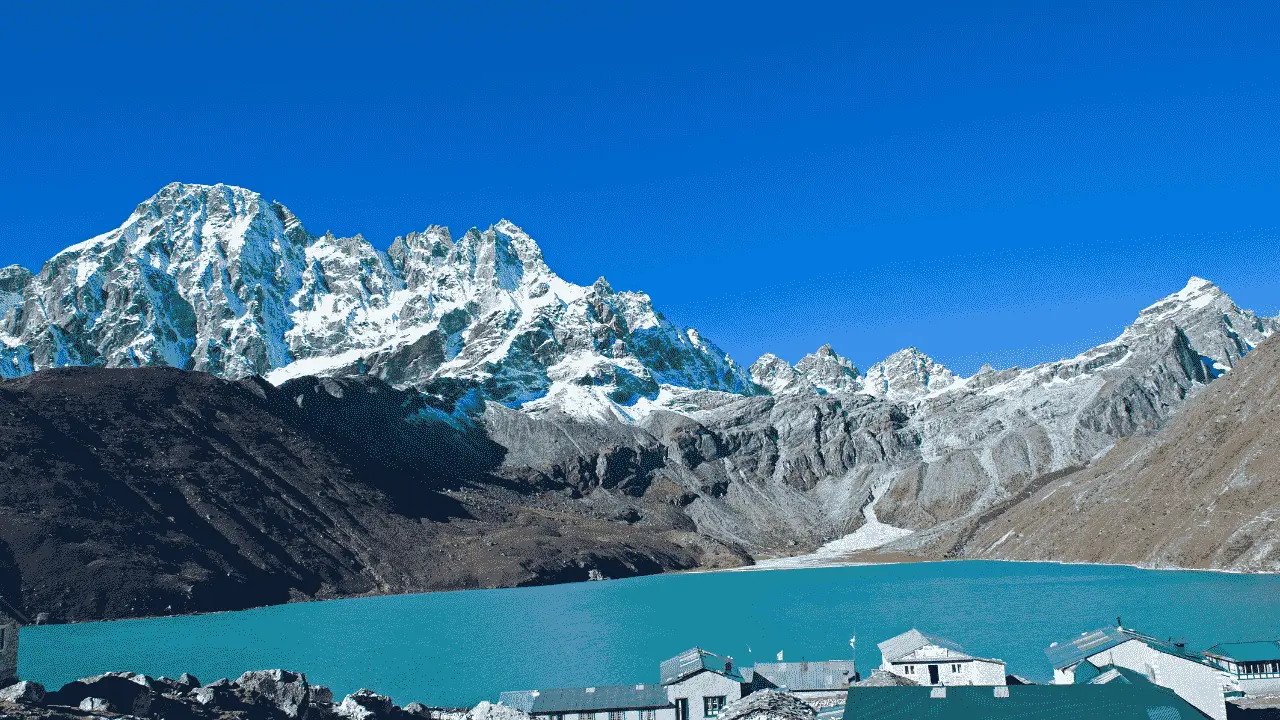
Day 8: Machhermo to Gokyo (4,790 m): This is one of the most visually rewarding days. The trail follows the Ngozumpa Glacier and offers panoramic alpine scenery. Gokyo village and its turquoise lakes are major highlights. This is a high sleeping altitude, so the day is intentionally short.
-
Day 9: Gokyo Lakes Exploration / Optional Gokyo Ri (5,357 m): Gokyo Ri is optional and should only be attempted if you feel strong and healthy. The ascent is short but steep. Trekkers who skip it can still enjoy the lakes and surrounding scenery. Resting instead of summiting is perfectly fine.
-
Day 10: Gokyo to Dole (4,200 m): A largely downhill day that aids recovery. Breathing is easier, energy improves, and walking becomes more comfortable. Descents still require care, especially for tired knees.
-
Day 11: Dole to Namche Bazaar: Continuing the descent makes this day feel easier, though walking time is similar. Forested trails and villages enhance the experience. Returning to Namche allows rest and access to amenities before the final trekking days.
-
Day 12: Namche Bazaar to Lukla: The final trekking day is mostly downhill. Avoid rushing. Reaching Lukla marks the completion of the trek, culminating in a strong sense of accomplishment.
-
Day 13–14: Return to Kathmandu & Buffer Days: These days act as buffers for possible weather-related flight delays at Lukla. If flights are on time, trekkers can rest and recover in Kathmandu before continuing their travel. Buffer days reduce stress and allow flexibility.
Best Time to Do the Gokyo Lakes Trek for First-Time Trekkers
First-time trekkers benefit most from seasons that are predictable, clear, and comfortable for walking. Spring (March–May) and autumn (September–November) are the best times to trek.
- Spring: Trails are neither too hot nor too cold, and the region comes alive with blooming rhododendrons. Days are generally warm, and nights are cold but manageable with proper clothing. Snow may linger at higher altitudes early in the season, but by April, trails are usually clear. Visibility is excellent, offering vivid mountain views, making spring ideal for first-time Himalayan trekkers.
- Autumn: This is the most popular trekking season. The weather is stable, the skies are clear, and the chance of heavy snowfall is low. Days are cool and perfect for trekking, while nights can be chilly at higher elevations.
- Seasons to Avoid: Winter brings extreme cold and heavy snow, while the monsoon season increases the risk of landslides, poor visibility, and flight delays. For a safe and enjoyable experience, beginners should stick to spring or autumn.
Packing List and Gear Recommendations for Beginner Trekkers
For beginners, packing appropriately is one of the most important aspects of trek preparation. Having the right equipment will keep you warm, dry, and comfortable, whereas overpacking makes the trek unnecessarily exhausting. The idea is to carry a light and intelligent packing list, and this means using layers and essential items that can be used throughout the trek.
General packing essentials for the Gokyo Lakes trek include:
-
Thermal base layer bottoms.
-
Mid-layer insulation, such as a fleece or down jacket.
-
Waterproof and windproof outer shell jacket.
-
Comfortable trekking pants.
-
A warm hat, a sun hat, and gloves.
-
Moisture-wicking trekking socks.
-
Broken-in trekking boots or shoes.
-
Lightweight sandals or camp shoes.
-
Comfortable trekking daypack (25-35 L).
-
Trekking poles for balance and knee support.
-
Warm sleeping bag rated for cold weather (-10°C or lower).
-
UV protection sunglasses.
-
Sunscreen and lip balm.
-
A water bottle or a hydration system.
-
A headlamp or torch.
-
Personal medications and a simple first aid kit.
-
Passport, trekking permits, and travel insurance information.
-
Cash in small denominations for daily expenses.
Permits, Costs, and Logistics for International Trekkers
International trekkers must carefully plan permits, budget, and logistics before embarking on the Gokyo Lakes trek. Despite the well-established trail, the trek passes through a remote part of the Himalayan area where accessibility, costs, and amenities differ significantly from those of typical tourist destinations. Understanding these factors will save time and reduce the stress that you will face after getting to Nepal.
The Sagarmatha National Park permit (around USD 30) and the Khumbu Pasang Lhamu Rural Municipality permit (around USD 20) are required for the trek. These permits are usually checked along the route and can be obtained in Kathmandu or en route. A TIMS card is not required for this trek.
Cost-wise, round-trip flights between Kathmandu and Lukla typically range from USD 350 to 450. Teahouse lodging costs about USD 5–10 per night, while meals average USD 25–40 per day, increasing at higher elevations.
Additional optional expenses include hiring a guide (USD 30–40 per day) or porter (USD 20–25 per day), which can be very helpful, especially for first-time trekkers. Daily trekking costs (excluding flights) average USD 40–70, and a full 12–14 day trek can total USD 1,200–1,800, depending on services used and personal spending.
The trek begins with a flight to Lukla, which is highly weather-dependent, so it’s wise to include buffer days in your schedule. At higher elevations, teahouses offer basic accommodation and meals, with extra charges for services such as hot showers, electricity, and device charging. Cash is essential, as the last reliable ATM is in Namche Bazaar. For safety and peace of mind, beginners are strongly advised to hire a licensed guide.
Tips for a Safe and Enjoyable Gokyo Lakes Trek
A successful Gokyo Lakes trek is not about speed or pushing limits; it is about moving smart, listening to your body, and appreciating the mountain environment. Beginners who prioritize safety and preparation are much more likely to enjoy the trek, and they will complete it feeling confident instead of feeling tired.
The cold temperatures, high altitude, and variable weather conditions of the place mean that even small decisions can have a significant impact. Simple habits such as walking at a slow pace, eating well, and having proper rest help your body adjust and improve your daily experience.
Key tips for a safe and enjoyable trek include:
-
Walk slowly and maintain a steady pace, especially at higher altitudes.
-
Drink water regularly throughout the day to stay hydrated.
-
Eat regular meals even if you lose your appetite.
-
Never skip acclimatization days; they are essential.
-
Monitor for early signs of altitude sickness.
-
Dress in layers and adjust clothing according to conditions.
-
Use trekking poles on descents to protect your knees.
-
Remain flexible regarding weather and flight delays.
-
Pace yourself carefully, especially above 4,000 meters.
FAQs
1: Do beginners need prior trekking experience before doing Gokyo Lakes?
No previous trekking experience is required, but a basic level of fitness is recommended. If you can walk several hours a day at a slow pace and carry a light backpack, the trek is achievable with proper acclimatization and a well-planned itinerary.
2: How cold are the teahouse rooms at higher altitudes?
Teahouse rooms are unheated, which become very cold at night, particularly above 4,000 meters. Temperatures often fall below 0°C, typically ranging from -10°C to -15°C at night, and a warm sleeping bag is a must for a comfortable night’s sleep.
3. Is there phone charging and electricity on the Gokyo Lakes trek?
Most villages have electricity, but at higher altitudes, device charging typically costs extra. Power outages are common, which is why power banks are highly recommended for beginners. Mobile network coverage is available up to Namche Bazaar, but becomes limited or unavailable at higher elevations
4. Can beginners safely trek without a guide on the Gokyo Lakes route?
The trail is clearly marked, but beginners may feel safer when accompanied by a licensed guide. A guide assists with navigation, helps manage acclimatization, and makes informed decisions, particularly during changing weather patterns.
5. Are emergency medical services available along the Gokyo Lakes trail?
Medical facilities are limited, with basic assistance available in some villages only. In serious emergencies, helicopter evacuation is the main option, making travel insurance that covers high-altitude trekking essential. Small health posts are located in Namche Bazaar and a few other villages along the route.